Starting your own locative game with PraxisMapper
Locative (location-based) games use the player's real world location or movement to affect or mediate in-game actions. You've probably played Pokemon Go, Ingress, Orna, or one of the roughly 100 other locative games that have come out since 2001, when Botfighters was the first game to allow players to attack each other in-game when they were close enough in the real world.
Locative games are often assumed to be expensive and complicated. Most instructions on making one will involve multiple layers of external providers, in-game middleware, and unbounded expenses depending on the popularity of the game. This is no longer an absolute truth. I'm going to walk you through making your own locative game for Android with PraxisMapper and Godot 4.4. Just follow along with these steps to get a baseline project up and going in minimal time.
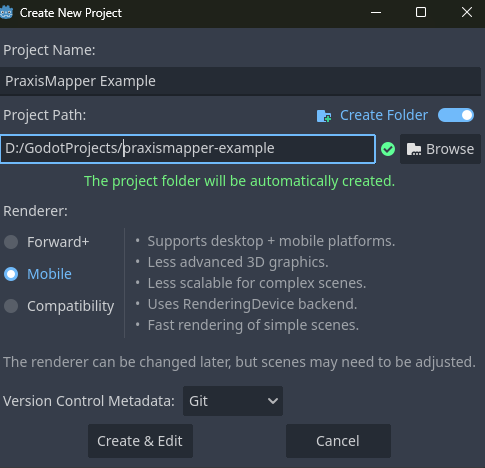
1) Create a new Godot project.
This step is self-explanatory. Assuming that you are using Godot 4.4, the newest major release as I write this. I'll be calling mine PraxisMapper Example. I pick the Mobile renderer, because this will be an Android game.
2) Copy the PraxisGodotComponents zip contents into your new project's folder.
Download the PraxisGodotComponents source from my page here on itch. You will want to copy 3 of the folders in it: addons (which includes the native Android GPS plugin), OfflineData (The demo app includes some for it's purposes, but we'll get different stuff here shortly), and PraxisMapper (which holds the GDScript code and components you'll use). Once they're in the folder, Godot will eventually notice there's new stuff to import and handle adding them to the window. It will list off some errors, though, which are simple to handle.
3) Set Globals and adjust default settings
Under Project/Project Settings, go to the Globals tab. You will need an entry named PraxisCore pointing at PraxisMapperScripts/PraxisCore.gd (that handles all the positioning logic and core functionality). PraxisCore currently needs to be an Autoload because of signals and helper functions that manipulate the active SceneTree, if you were wondering why this one step is necessary.
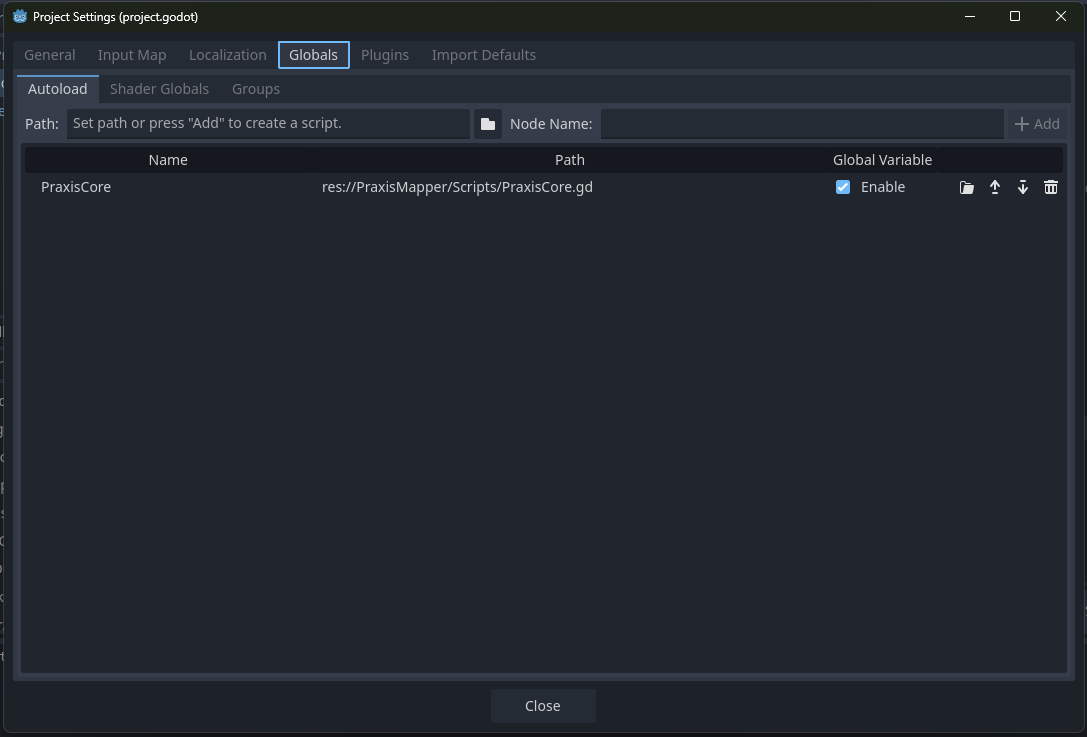
This is enough to clear up the errors
Godot 4.4 now disables sensors on mobile platforms by default. We will need to turn those back on to be able to determine a player's immediate facing. Search for 'sensors' in the Project Settings window and enable all of them.
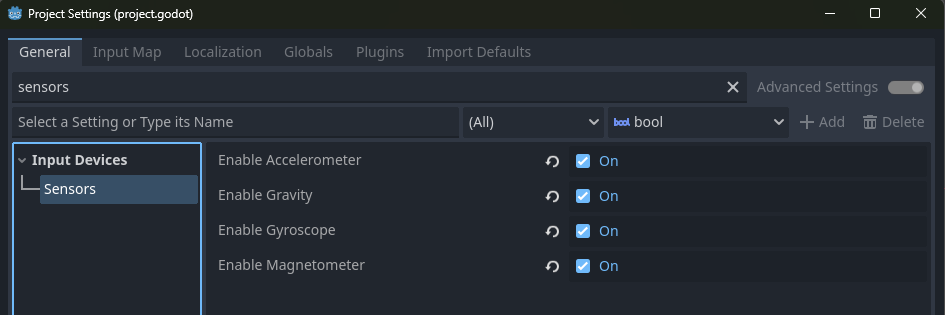
Technically optional, if you don't want the player to know which way they're pointing their phone. But very helpful for figuring out where to go.
In PraxisCore.gd, there is a default value for the game's starting position until it gets a lock on your GPS coordinates. It defaults to a parking lot in Dodger Stadium in Los Angeles, CA. It includes several other possible default values that may be more local or relevant to your game. You can also set your own, if you want the game to show more familiar territory during development.
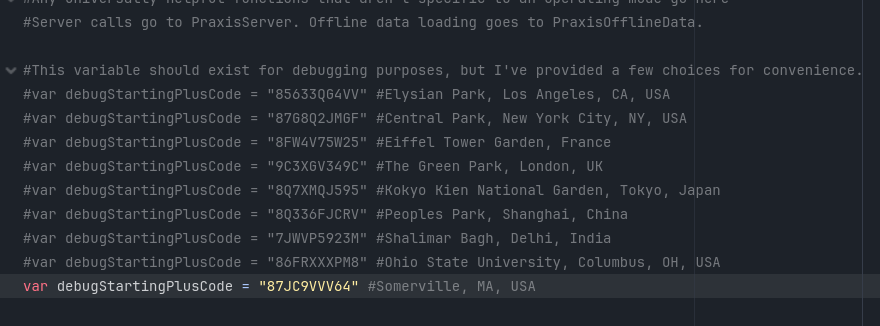
A selection of places of interest for testing, and the one I'll use for this tutorial
To find your PlusCode, its easiest to go to plus.codes/map, enable displaying the grid from the menu button, and scrolling to where you want to use for testing. For this example, a randomly selected spot near Somerville, MA is at 87JC9VVV+64. Understanding what this code means and how to read it is handled in other docs. The important details for now are that it's a grid full of grids, and longer codes are smaller squares.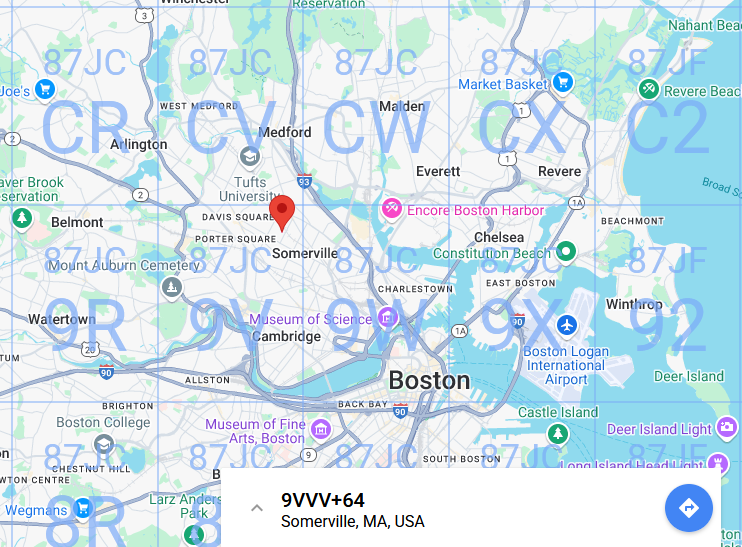
A map of the area around where I've picked for this tutorial, with our starting point at the pin.
4) Create a new map scene for your game.
Create new scene for your game. Then, right-click on your scene's root node and pick Instantiate Child Scene. Select PraxisMapper/Controls/ScrollingCenteredMap2.tscn from this list. Reposition it so that the point marked as the center is where you want the map to be centered on-screen. Hit Run and lets see what happens.
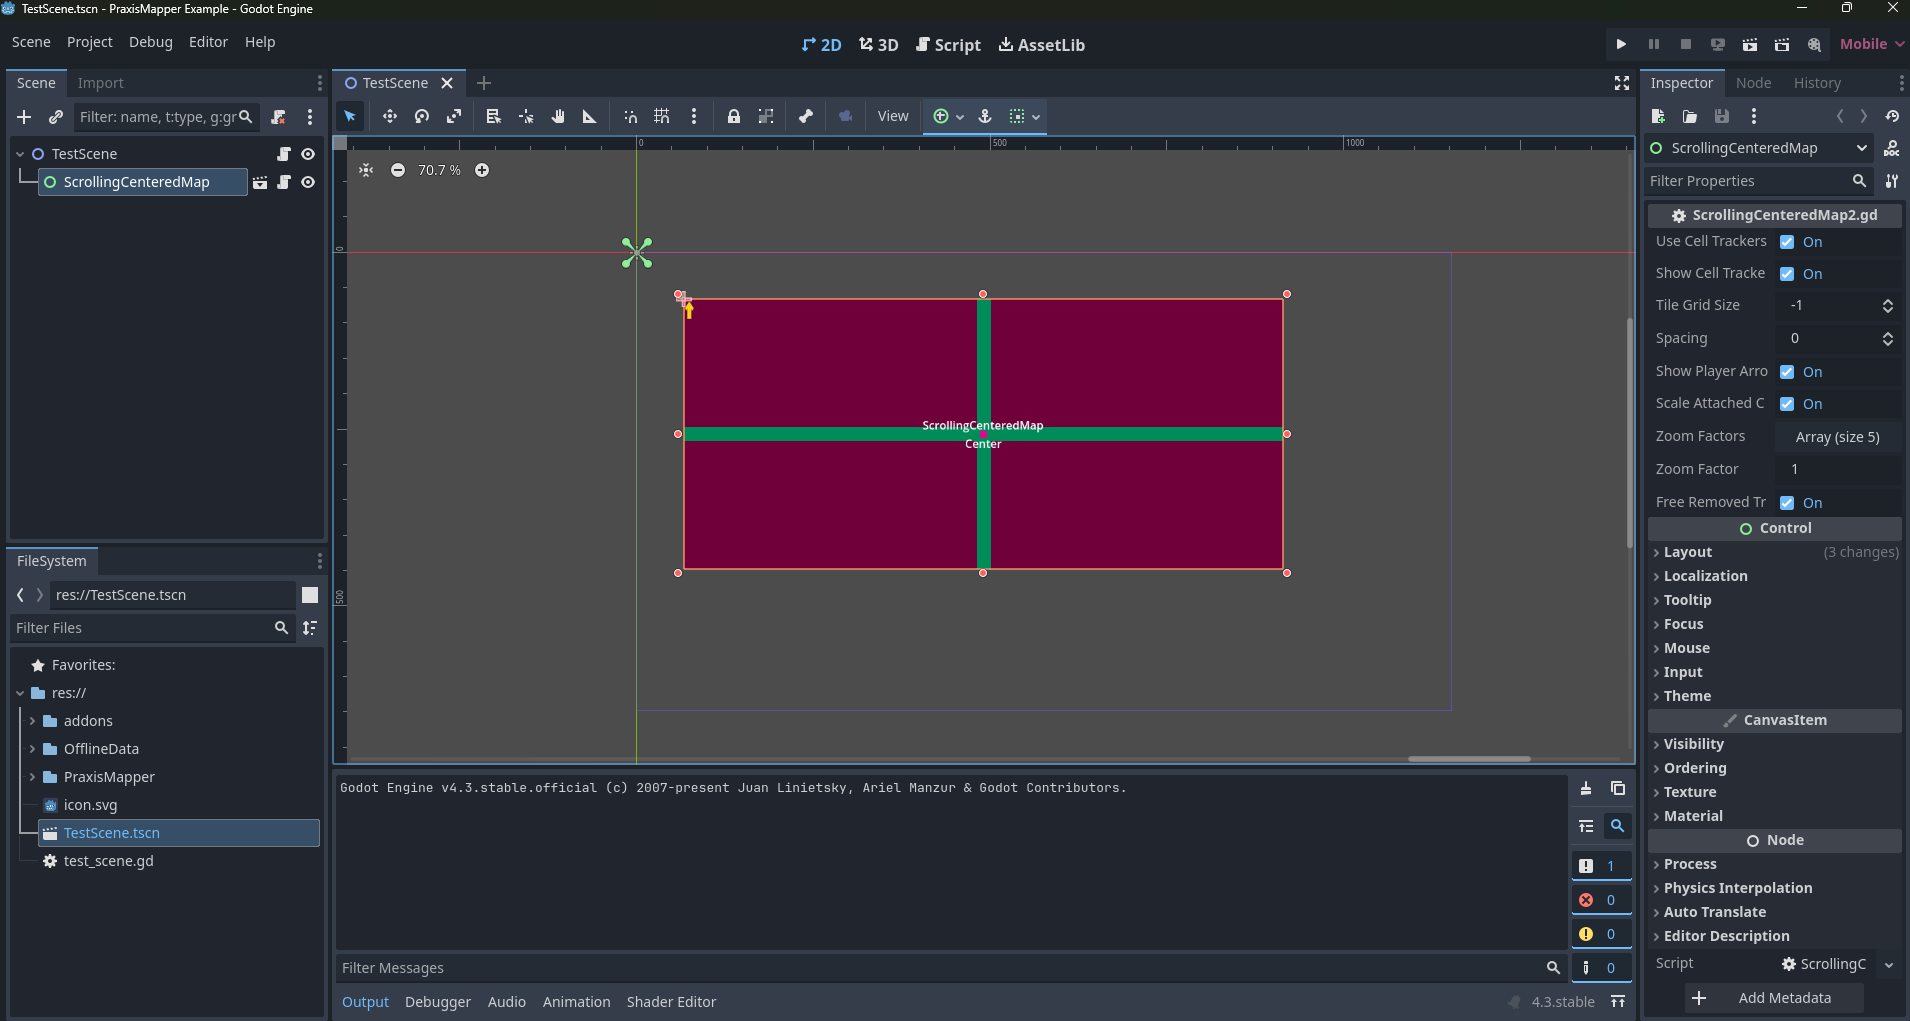
The complete scene layout at this point, You can change the size of the ScrollingCenteredMap as you see fit
It ran, but didn't draw anything. We need to get some map data into our game. For now, we'll include the data we need for this from my server. If you used my example, download https://global.praxismapper.org/Content/OfflineData/87/87JC.zip . If you picked your own PlusCode, edit the URL so the subfolder is the first 2 digits of your PlusCode, and the zip file's name is the first 4 digits. So if you decided to use the Eiffel Tower instead of Somerville, you'd change /87/87JC.zip to /8F/8FW4.zip. Yes, the entire planet is available, and you can grab a couple of files from here to try this out for yourself. No, don't crawl my site for all 50GB of this data. I can send you a jump drive with it at cost if you need it, or you can generate it yourself later on.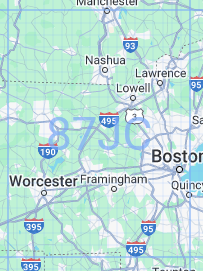
This image covers the entire area you just downloaded data for, if you picked the same starting point I did. If not, you'll cover a similar sized area.
Back to your project folder, copy your zip file in OfflineData/Full/87/87JC.zip (or update the path to match your chosen PlusCode if you're using your own). Run the scene again, and you'll see the Drawing banner show up and the map tiles will fill in! PraxisMapper's Godot components will draw the map tiles on your phone. You'll see an arrow indicating where the player is standing and which direction they're facing (always south, when developing on PC/Mac).
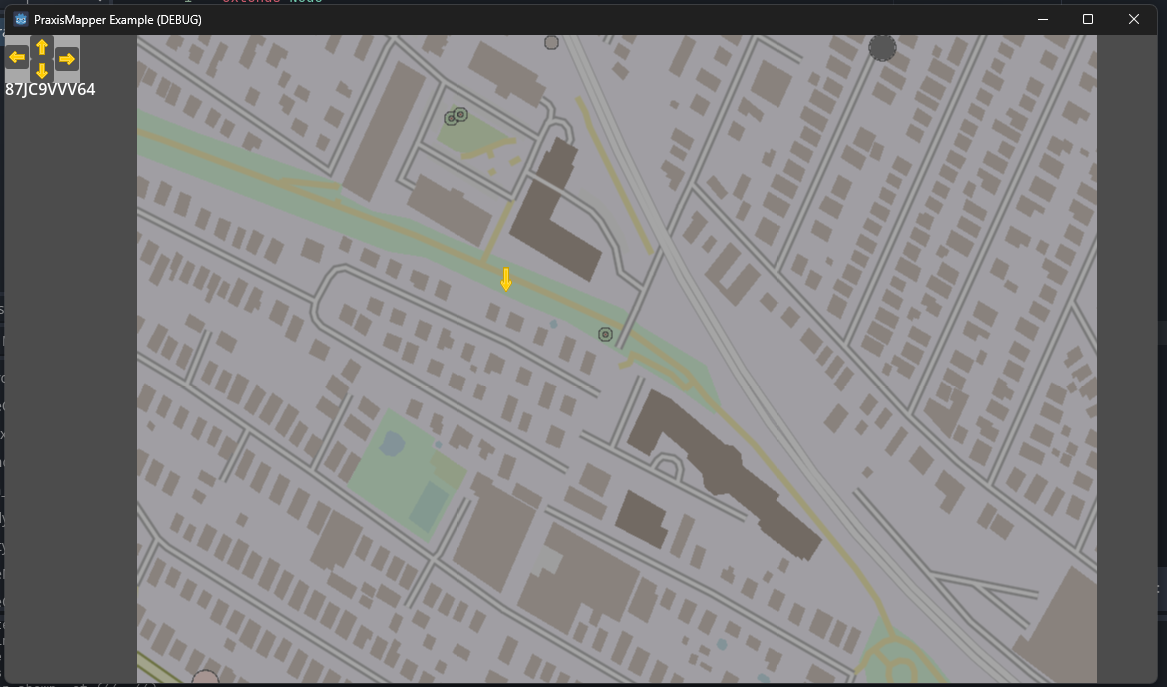
That grey haze? It's intentional. We'll get to that in a step or two.
So that's the core control for getting map tiles on screen, and now this app doesn't need a network connection or any Google Maps API keys or anything. It only works in the 1 degree square area we loaded into the game, but that can be addressed later.
While we're here, look at the upper left corner of the screen. PraxisMapper includes a debug movement control automatically when you're on a platform that doesn't have GPS capabilities. When you're developing your game, you can either click the arrow buttons to move 1 Cell10 in that direction, or use the arrow keys on your keyboard to move quickly.
5) Create objects to add to the map.
There are many ways you may want to handle displaying objects on the map, depending on your game. This may be optional for your game idea, or it might be core to the experience. These will be full Node2Ds, so they can have child nodes attached and detect inputs and handle all sorts of their own logic. Heres a few ideas Ive had so far for managing these, in rough order of complexity.
- A static list of nodes for a focused, small area game
- use a random seed per Cell8 maptile to determine what nodes show up in it.
- load from files that were generated outside of the client.
- Track geometry objects, and return those that intersect with the given visible area.
In this case, lets generate one node per Cell8 map tile to show how this works. The ScrollingCenteredMap2 scene will call a function that takes the Cell8 in the upper-left corner, and how big the square grid is. We will write a function that loops through each cell in the grid, and generates a randomly colored square in a random position. We also need to pass that function to the SetLoadableSource function in our map. The whole scene's script will look like this:

This is all the code you need in your scene's scripts for this
And in text format for your convenience:
func _ready() -> void:
$ScrollingCenteredMap.SetLoadableSource(MakeAreaNode)
func MakeAreaNode(cell8, gridSize):
var results = []
for x in gridSize:
for y in gridSize:
var thisCell8 = PlusCodes.ShiftCode(cell8, x, -y)
#Make an RNG that always gives the same values for the same inputs.
var rng = PraxisCore.GetFixedRNGForPluscode(thisCell8)
#Pick a Cell10 inside this Cell8
var yCoord = PlusCodes.CODE_ALPHABET_[rng.randi_range(0,19)]
var xCoord = PlusCodes.CODE_ALPHABET_[rng.randi_range(0,19)]
#Make a random colored square for that point.
var color = Color.from_hsv(rng.randf(),rng.randf(),rng.randf())
var colorRect = ColorRect.new()
colorRect.size = Vector2(80,80)
colorRect.color = color
colorRect.set_meta("location", thisCell8 + yCoord + xCoord)
results.append(colorRect)
return results
Now when we run the game, we'll see those generated nodes show up on the map, moving automatically with it! 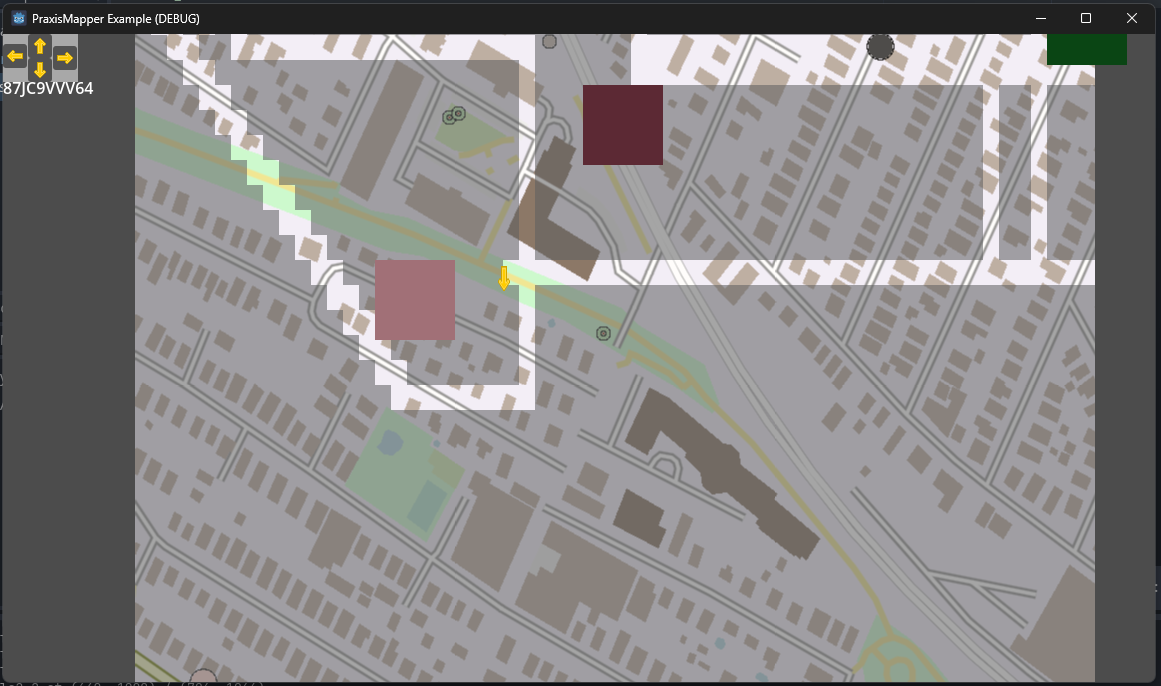
Those 3 colored squares move with the map like you'd expect.
You might have noticed that there's now bright lines on the screen as well. That's the CellTracker built into the SCM2 control, showing where the player has been. In this case, it's just me doing some debug movement with the arrow keys. You can turn the display for those on and off by calling ToggleShowCellTrackerDrawers() on the map control. Adding a button to toggle that is very easy, or you can uncheck the "Use Cell Trackers" box on the map in the scene editor and the scene will never create or display them.
6) Draw the rest of the owl
This tutorial works on the PC, where you will do most of your early development. If/when you go to export this for Android, you will need to check a few settings specifically in the Export window. Use Gradle Build, Allow Coarse Location, Allow Fine Location, and Internet should be enabled. You will also need to call OS.request_permissions() somewhere in your app in order for the user to grant access to the GPS data the game needs to work. It should be on a button that the use presses after knowing what/why the game needs the permisison, rather than occurring immediately on startup. Check the Scenes/SimpleTest.tscn scene in the source code for a quick example of this, or the LandingScene.tscn file in my other projects for a different one-shot informed consent example.
That's the basics you'll need to build a locative game with PraxisMapper. The ScrollingCenteredMap2 control gives you a 2D basis for anything you want to overlay directly on a map. The nodes you pass in to it can be anything locked to a location, and could handle taps/clicks or 2D colliders for basic interactions. You can use PraxisCore to get the player's current position and get a signal when they move. From here, it's a matter of building up to match your ideas.
There are several other controls and scripts in PraxisMapper to use for common behaviors, like CellTracker to have a single point where a player has been, or RecentActivityTracker if you want to know where a player has or has not been in a particular amount of time, such as daily or hourly resets. You can call PraxisOfflineData.GetPlacesPresent to find out what named places on the map the player is standing on, and what TYPE of place they are. I love having games that have actions at parks and libraries personally, but the default mapTiles style has many different type of place available to check for. You can customize your maptiles, too. Make a backup copy of PraxisMapper/Styles/mapTiles.json, and change the colors or commands for your maptiles. Scanner logic is available as well, to find places of a particular type at a given distance, or the nearest ones. There are probably other things I've forgotten, or that you've thought of that will be the key feature for your games.
PraxisMapper Godot Components are open source, under the MIT license. You should feel free to dig into the code and change things to suit your needs.
Bonus: Separate your app from the PraxisMapper servers
If you want to expand the scope of your game, or customize and control your map data, you'll want to handle creating your own data set and get away from using global.praxismapper.org as your only data source. You don't control the server, so you can't guarantee that it'll stay running. You can download the server-side components for PraxisMapper Server and the OpenStreetMap extract for where you want to play your game, process them to suit your needs, and either build that data into your client or run a simple filehost that can server map data on demand to players.
You can host your own PraxisMapper Server instance if you want, and use that to power asynchronous mulitplayer games. Head-to-head multiplayer is better done with Godot's own multiplayer features.
Leave a comment
Log in with itch.io to leave a comment.